Downsampling and zooming
Less than 2 decades ago, google revolutionised the digital maps system, raising the bar of maps rendering and helping people to navigate in the unknown. Helping tourists and drivers to drammatically speed up the time to analyze a route and get the next step. With time-series dates and numbers, several indicators where created to make data scientists digest things faster like candle sticks and indicators that can easily show insights about relevant moments in the data.
In this tutorial, we're going to cover data resolution and how to present data in a reasonable resolution.
if you're zooming out years of time-series data, no matter how wide is your monitor, probably you'll not be able to see more than a few thounsand points in your screen.
One of the hard challenges we face to plot data is downsampling it in a proper resolution. Generally, when we zoom in, we lose resolution as we focus on a slice of the data points available. With less data points, the distribution of the data points become far from each other and we adopt lines between the points to promote a fake connection between the elements. Often, fetching all the data seems unreasonable and expensive.
In this tutorial, you'll see how Timescale can help you to strike a balance between speed and screen resolution. We're going to walk you through a downsampling method that allows you to downsampling milions of records to your screen resolution for a fast rendering process.
Establishing a threshold that is reasonable for the screen resolution, every zoom in will fetch new slices of downsampled data.
Downsampling in the the front end is pretty common for the plotting libraries, but the process still very expensive while delegating to the back end and make the zooming experience smooth like zooming on digital maps. You still watch the old resolution while fetches nes data and keep narrowing down for a new slice of data that represents the actual period.
In this example, we're going to use the lttb function, that is part of the functions pipelines that can simplify a lot of your data analysis in the database.
If you're not familiar with the LTTB algorithm, feel free to try the LTTB Tutorial first and then you'll understand completely how the downsampling algorithm is choosing what points to print.
The focus of this example is to show how you can build a recursive process to just downsample the data to keep it with a good resolution.
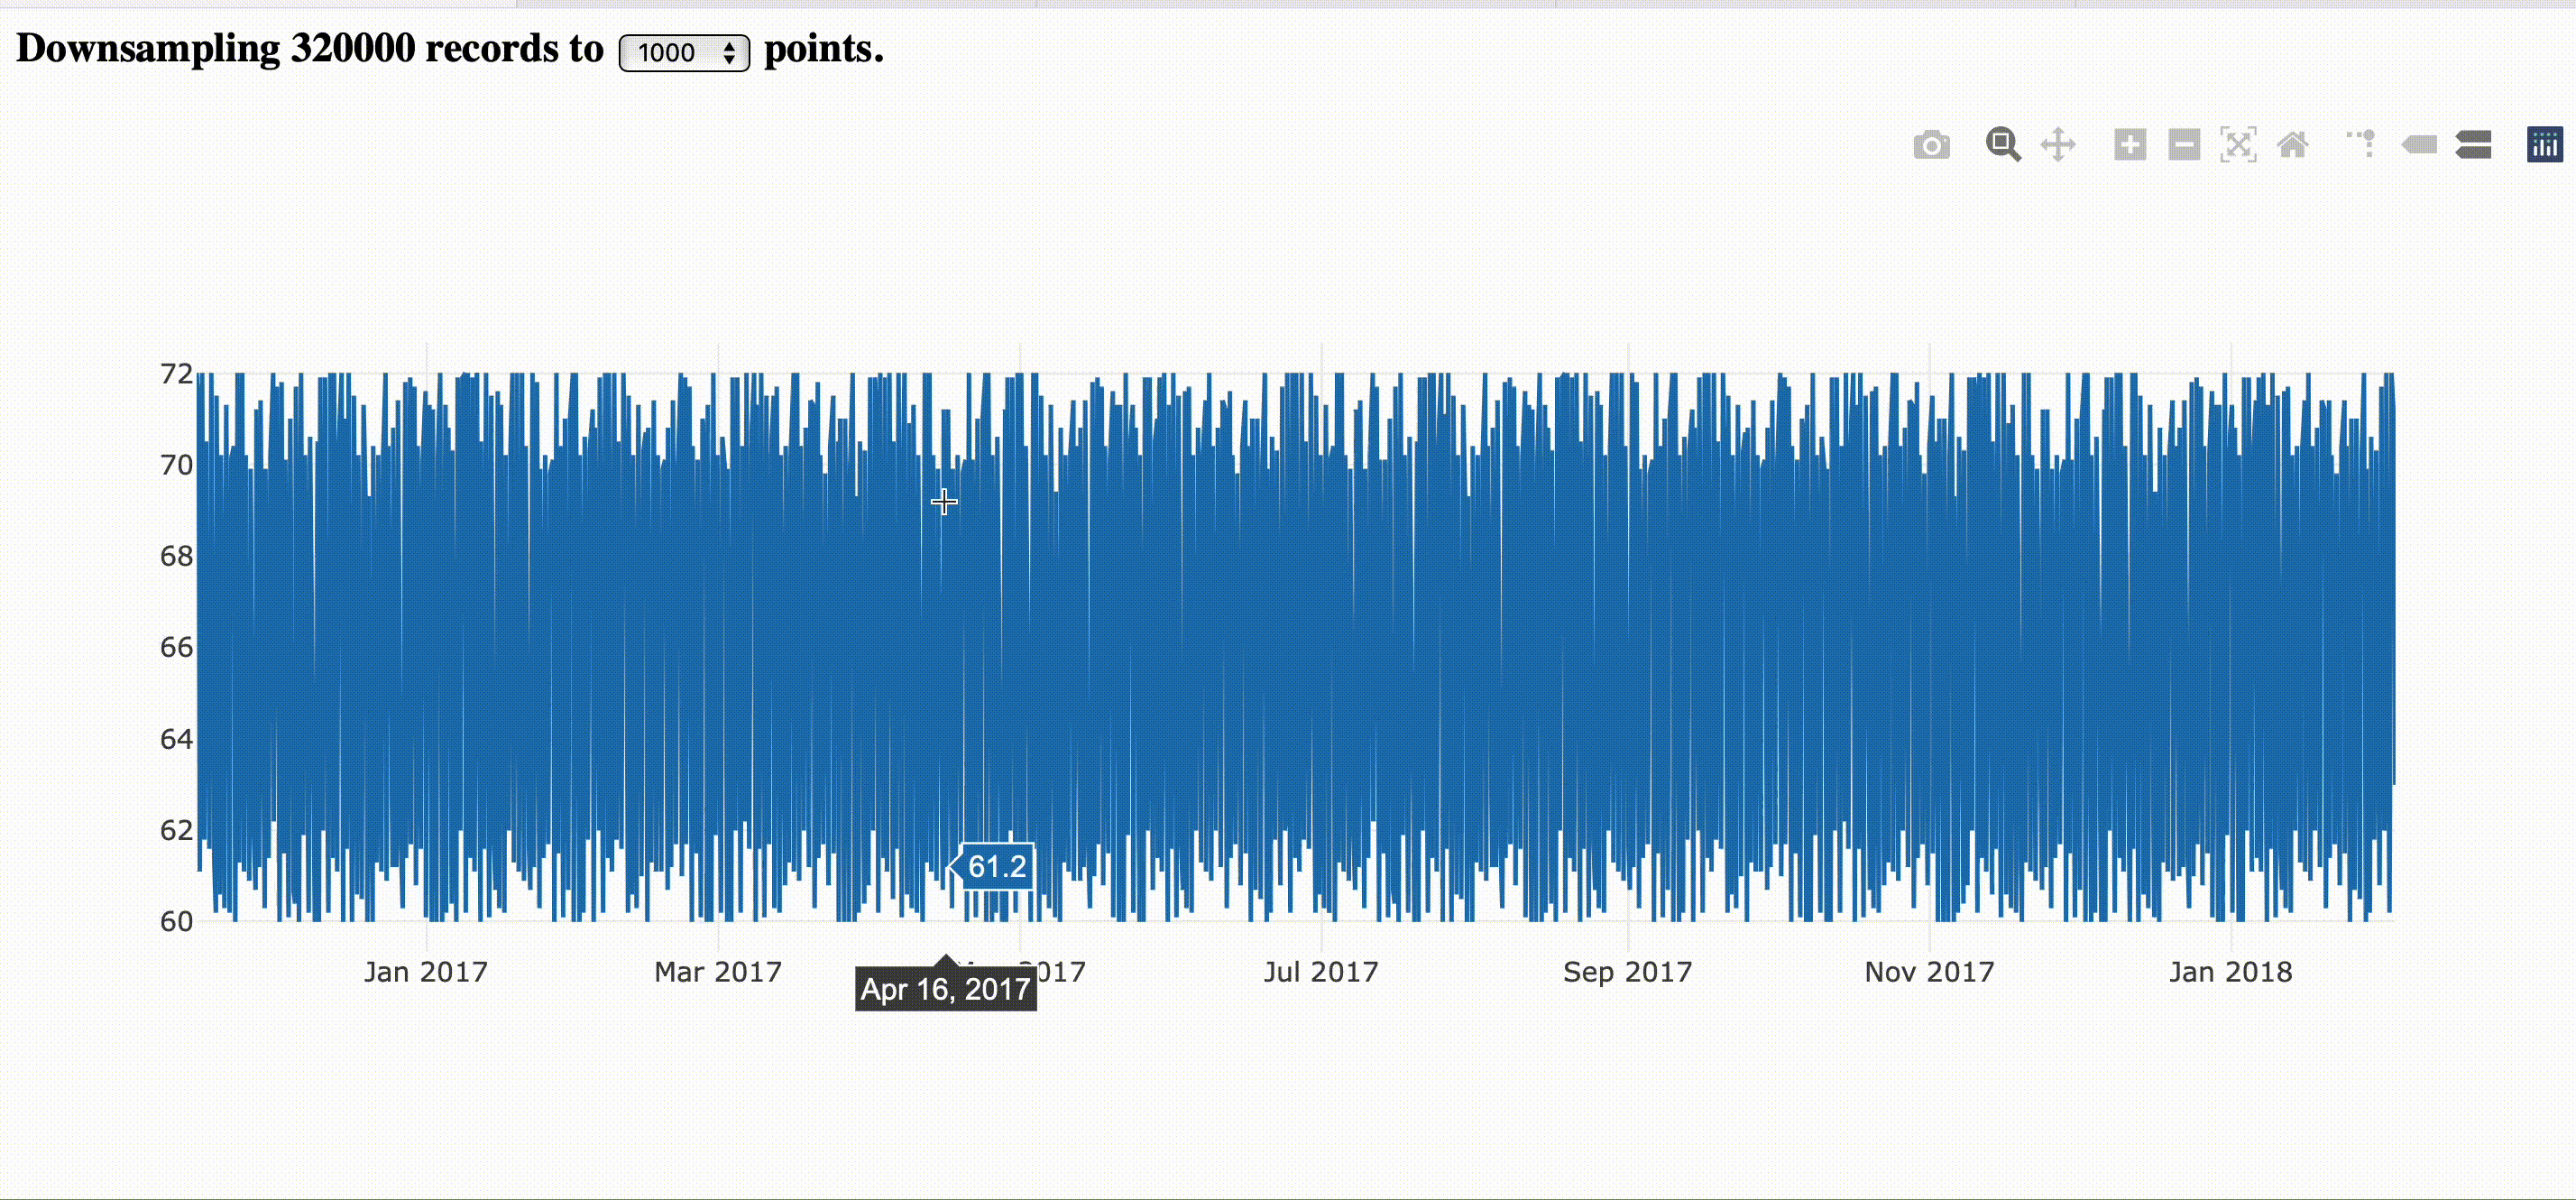
The image bellow corresponds to the step by step guide provided here.
If you want to just go and run it directly, you can fetch the complete example here.
Now, we'll split the work in two main sessions: preparing the back-end and front-end.
Preparing the Back end
The back-end will be a Ruby script to fetch the dataset and prepare the database in case it's not ready. It will also offer the JSON endpoint with the downsampled data that will be consumed by the front-end.
Set up dependencies
The example is using Bundler inline, as it avoids the creation of the Gemfile. It's very handy for prototyping code that you can ship in a single file. You can declare all the gems in the gemfile code block, and Bundler will install them dynamically.
require 'bundler/inline' #require only what you need

gemfile(true) do
  gem 'timescaledb'
  gem 'pry'
  gem 'sinatra', require: false
  gem 'sinatra-reloader'
  gem 'sinatra-cross_origin'
end
The Timescale gem doesn't require the toolkit by default, so you must specify it to use.
Warning
Note that we do not require the rest of the libraries because Bundler inline already requires the specified libraries by default which is very convenient for examples in a single file.
Let's take a look at what dependencies we have for what purpose:
- timescaledb gem is the ActiveRecord wrapper for TimescaleDB functions.
- sinatra is a DSL for quickly creating web applications with minimal effort.
Only for development purposes we also have:
- The pry library is widely adopted to debug any Ruby code. It can facilitate to explore the app and easily troubleshoot any issues you find.
- The
sinatra-cross_originallow the application to use javascript directly from foreign servers without denying the access. - The
sinatra-reloaderis very convenient to keep updating the code examples without the need to restart the ruby process.
require 'sinatra'
require 'sinatra/json'
require 'sinatra/contrib'
require 'timescaledb/toolkit'

register Sinatra::Reloader
register Sinatra::Contrib
Setup database
Now, it's time to set up the database for this application. Make sure you have TimescaleDB installed or learn how to install TimescaleDB here.
Establishing the connection
The next step is to connect to the database so that we will run this example with the PostgreSQL URI as the last argument of the command line.
If this line works, it means your connection is good.
Downloading the dataset
The data comes from a real scenario. The data loaded in the example comes from the weather dataset and contains several profiles with more or less data and with a reasonable resolution for the actual example.
Here is small automation to make it run smoothly with small, medium, and big data sets.
VALID_SIZES = %i[small med big]
def download_weather_dataset size: :small
  unless VALID_SIZES.include?(size)
    fail "Invalid size: #{size}. Valid are #{VALID_SIZES}"
  end
  url = "https://timescaledata.blob.core.windows.net/datasets/weather_#{size}.tar.gz"
  puts "fetching #{size} weather dataset..."
  system "wget \"#{url}\""
  puts "done!"
end
Now, let's create the setup method to verify if the database is created and have the data loaded, and fetch it if necessary.
def setup size: :small
  file = "weather_#{size}.tar.gz"
  download_weather_dataset unless File.exists? file
  puts "extracting #{file}"
  system "tar -xvzf #{file} "
  puts "creating data structures"
  system "psql #{PG_URI} < weather.sql"
  system %|psql #{PG_URI} -c "\\COPY locations FROM weather_#{size}_locations.csv CSV"|
  system %|psql #{PG_URI} -c "\\COPY conditions FROM weather_#{size}_conditions.csv CSV"|
end
Info
Maybe you'll need to recreate the database if you want to test with a different dataset.
Declaring the models
Now, let's declare the ActiveRecord models. The location is an auxiliary table to control the placement of the device.
class Location < ActiveRecord::Base
  self.primary_key = "device_id"

  has_many :conditions, foreign_key: "device_id"
end
Every location emits weather conditions with temperature and humidity every X minutes.
The conditions is the time-series data we'll refer to here.
class Condition < ActiveRecord::Base
  acts_as_hypertable time_column: "time"
  acts_as_time_vector value_column: "temperature", segment_by: "device_id"
  belongs_to :location, foreign_key: "device_id"
end
Putting all together
Now it's time to call the methods we implemented before. So, let's set up a logger to print the data to the standard output (STDOUT) to confirm the steps and add the toolkit to the search path.
Similar to database migration, we need to verify if the table exists, set up the hypertable and load the data if necessary.
ActiveRecord::Base.connection.instance_exec do
  ActiveRecord::Base.logger = Logger.new(STDOUT)
  add_toolkit_to_search_path!

  unless Condition.table_exists?
    setup size: :small
  end
end
The setup method also can fetch different datasets and you'll need to manually drop the conditions and locations tables to reload it.
Filtering data
We'll have two main scenarios to plot the data. When the user is not filtering any data and when the user is filtering during a zoom phase.
To simplify the example, we're going to use only the weather-pro-000001 device_id to make it easier to follow:
def filter_by_request_params
  filter= {device_id: "weather-pro-000001"}
  if params[:filter] && params[:filter] != "null"
    from, to = params[:filter].split(",").map(&Time.method(:parse))
    filter[:time] = from..to
  end
  filter
end
The method is just building the proper where clause using the ActiveRecord style to be filtering the conditions we want to use for the example. Now, let's use the previous method defining the scope of the data that will be downsampled from the database.
Downsampling data
The threshold can be defined as a method as it can also be used further in the front-end for rendering the initial template values.
Now, the most important method of this example, the call to the lttb function that is responsible for the downsampling algorithm. It also reuses all previous logic built here.
The segment_by keyword explicit nil because we have the segment_by explicit in the acts_as_time_vector macro in the model that is being inherited here. As the filter is specifying a device_id, we can skip this option to simplify the data coming from lttb.
The lttb scope
The lttb method call in reality is a ActiveRecord scope. It is encapsulating all the logic behind the library. The SQL code is not big, but there's some caveats involved here. So, behind the scenes the following SQL query is executed:
SELECT time AS time, value AS temperature
FROM (
  WITH ordered AS
    (SELECT "conditions"."time",
      "conditions"."temperature"
      FROM "conditions"
      WHERE "conditions"."device_id" = 'weather-pro-000001'
      ORDER BY time, "conditions"."time" ASC)
  SELECT (
    lttb( ordered.time, ordered.temperature, 50) ->
    toolkit_experimental.unnest()
  ).* FROM ordered
) AS ordered
The acts_as_time_vector macro makes the lttb scope available in the ActiveRecord scopes allowing to mix conditions in advance and nest the queries in the way that it can process the LTTB and unnest it properly.
Also, note that it's using the -> pipeline operator to unnest the timevector and transform the data in tupples again.
Exposing endpoints
Now, let's start with the web part using the sinatra macros. First, let's configure the server to allow cross origin requests and fetch the javascripts libraries directly from their official website.
Now, let's declare the root endpoint that will render the index template and the JSON endpoint that will return the downsampled data.Note that the erb template should be on views/index.erb and will be covered in
the front end section soon.
Front end
The front-end will be a simple HTML with Javascript to Plot the fetched data and asynchronouysly refresh the data in a new resolution in case of zooming in.
The sinatrarb works with a simple "views" folder and by default it renders erb templates that is a mix of Ruby scriptlets and HTML templates.
All the following snippets goes to the same file. They're just split into separated parts that will make it easier to understand what each part does.
Let's start with the header that contains the extra scripts.
We're just using two libraries:
- jQuery to fetch data async with ajax calls.
- plotly to plot the data.
<head>
  <script src="https://cdn.jsdelivr.net/npm/jquery@3.6.1/dist/jquery.min.js"></script>
  <script src="https://cdn.plot.ly/plotly-latest.min.js"></script>
</head>
Now, let's have a small status showing how many records are present in the database and allowing to use a different threshold and test different subset of downsampled data.
<h3>Downsampling <%= conditions.count %> records to
  <select value="<%= threshold %>" onchange="location.href=`/?threshold=${this.value}`">
    <option><%= threshold %></option>
    <option value="50">50</option>
    <option value="100">100</option>
    <option value="500">500</option>
    <option value="1000">1000</option>
    <option value="5000">5000</option>
  </select> points.
</h3>
Note that some Ruby scripts are wrapped with <%= ... %>in the middle of the HTML instructions to inherit the defaults established in the back-end.
Now, it's time to declare the div that will receive the plot component and declare the method to fetch data and create the chart.
<div id='container'></div>
<script>
  let chart = document.getElementById('container');
  function fetch(filter) {
    $.ajax({
      url: `/lttb_sql?threshold=<%= threshold %>&filter=${filter}`,
      success: function(result) {
        let x = result.map((e) => e[0]);
        let y = result.map((e) => parseFloat(e[1]));
        Plotly.newPlot(chart, [{x, y}]);
        chart.on('plotly_relayout',
          function(eventdata){
            fetch([eventdata['xaxis.range[0]'], eventdata['xaxis.range[1]']]);
          });
      }});
  }
  fetch(null);
</script>
That's all for today folks!
4: